
FFVP Applications: Review Submitted Application
Purpose
This guide provides streamlined instructions for State Agency users to review and approve SFA/Sponsor FFVP Applications in Submitted status, focusing on navigating individual application tabs to manage program participation, site approvals, and final determinations.
Application Tabs | Tab Information |
General |
|
Application * |
|
Budget * |
|
Documents * |
|
Approval * |
|
Correspondence |
|
History |
|
* indicates that the tab needs to be Approved or Edits Requested during the review process.
Step-by-Step Instructions
Locating Submitted Applications
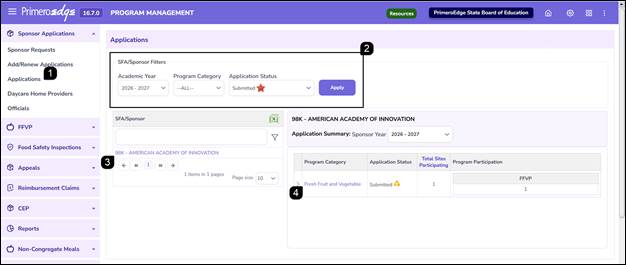
- Navigate to the Program Management module > Sponsor Applications > Applications page.
- Complete the applicable search criteria, such as Sponsor Year, Program Category, and Application Status, then click Apply.
Note: Select Submitted as the application status to only find those applications that have been submitted by the SFA/Sponsor.
- Click the SFA/Sponsor hyperlink to open the Application Summary.
- Click the Program Category hyperlink (e.g., Fresh Fruit and Vegetable) to open the full application record.
General Info Tab
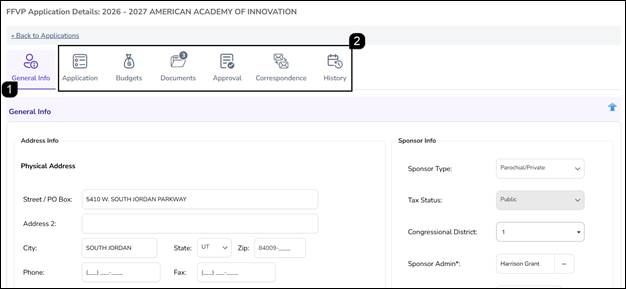
«Each time you open an application, you will be taken to the General Info tab first. Note the other tabs as you will work through these to complete the application process.
- Review each section on the General Info tab and make any adjustments as needed, ensuring you click Save at the bottom of the tab.
- Click the tabs at the top of the application to move through the application.
Note: The tabs listed are based on the program application type, the SFA/Sponsor's specific program participation and how certain questions within the application were answered.
Application Tab
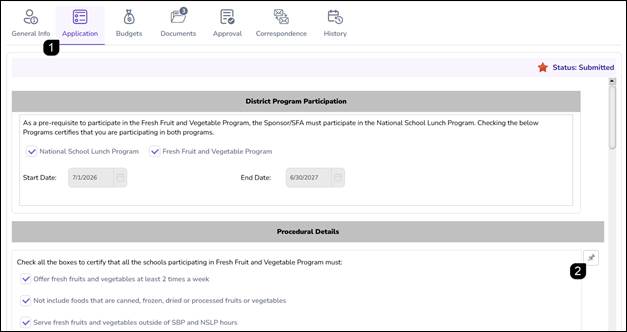
- Navigate to the Application – Sponsor tab and review the responses to the application questions.
Note: The tab is in Submitted status at this time.
Note: Responses cannot be changed by the State Agency.
- To add a note to a question, click the Pushpin icon next to the question.
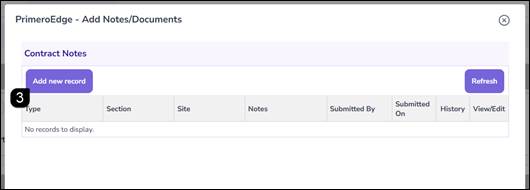
- A pop-up will appear. Click Add new record.
- Enter the note in the text box.
- Check the Internal (not visible to SFA/Sponsor) checkbox to prevent the note from being shared with the SFA/Sponsor.
- Click Insert to add the note.
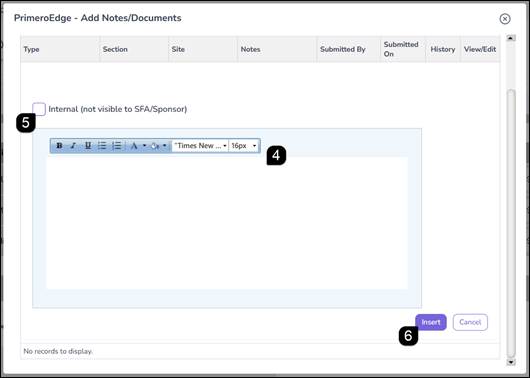
Note: The Pushpin icon will turn red indicating a note has been added.
- When tab review is completed, either:
- Select Approve to finalize the tab.
- Select Request Edits if the Sponsor needs to correct/edit their responses.
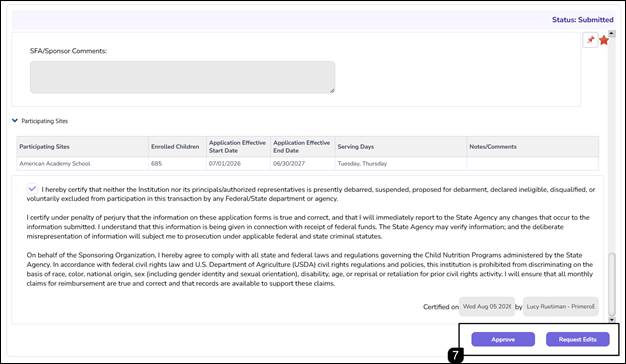
Approve: Application Tab
Note: Approve will trigger a green success message and change the tab status to Final Approved.
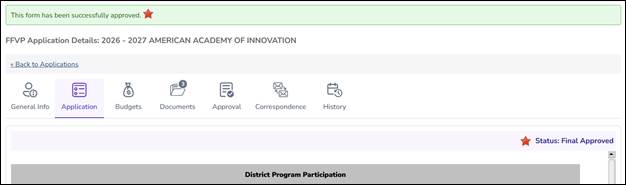
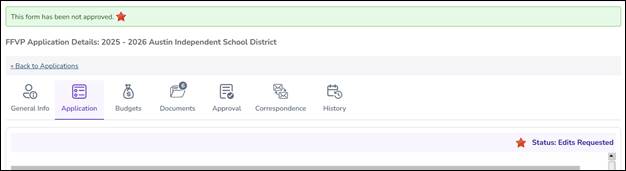
Request Edits: Application Tab
- Request Edits will trigger a pop-up that requires Reason for Edits Requested.
Note: Any notes added to the tab that were not Internal Only will display in the Reason for Edits Requested.
- Click Ok.
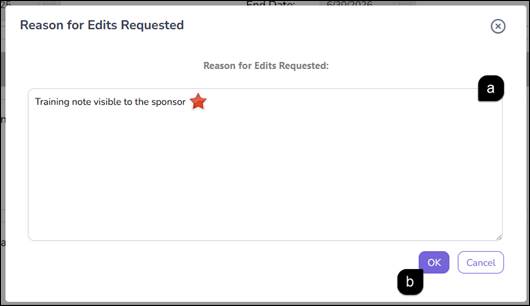
Note: A green success message will appear, and the tab status will change to Edits Requested.
Note: A notification will be sent to the SFA/Sponsor letting them know that edits have been requested with details.
Budgets Tab
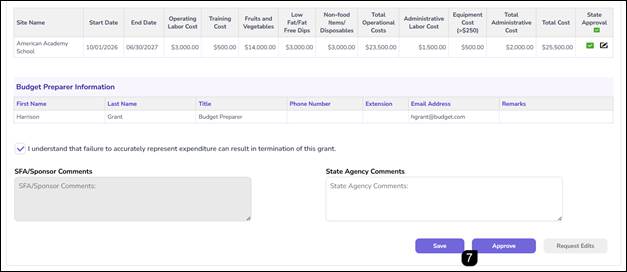
- Navigate to the Budgets tab and review the budget tables and site breakdowns.
Note: The tab is in Submitted status at this time.
- Optionally, use the arrows to collapse/expand the tables.
Note: Responses cannot be changed by the State Agency.
- When the budget review is completed, either click the Checkmark (Approve) or Pencil (Request Edits) for each site in the State Agency Approval column.
- To approve all sites in the table, use the radio buttons in the header row.
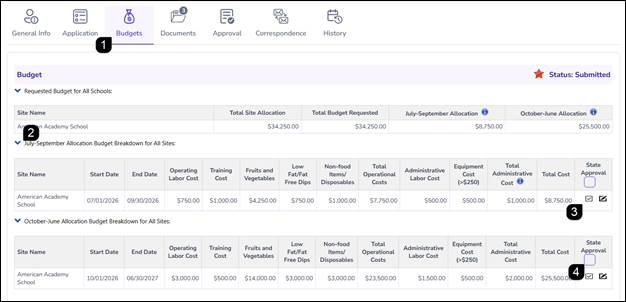
Note: Clicking the Pencil to Request Edits will trigger popup requiring the reason for requesting edits.
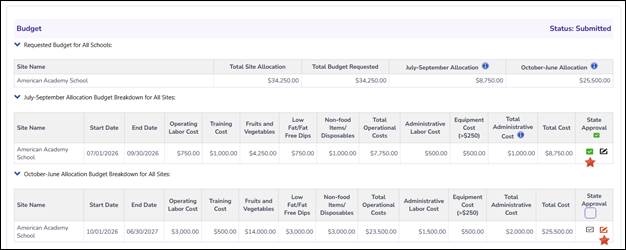
Note: Approving a site will change the Checkmark to green.
Note: Requesting Edits to a site will change the Pencil to red but anotification will not be sent to the SFA/Sponsor until the Edits Requested button at the bottom of the tab is selected.
- Optionally, enter a State Agency Comment at the bottom of the page.
- If any of the site budgets have edits requested, click the Request Edits button at the bottom of the page.
Note: Request Edits will trigger a green success message and change the tab status to Edits Requested.
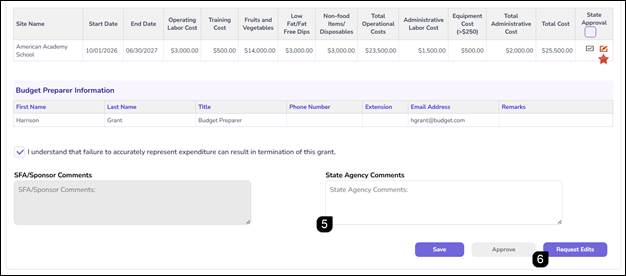
- When all site budgets have been approved, the Approve button appears at the bottom of the table to approve the Budgets tab.
Note: All site budgets must be Approved to Approve the Budgets tab.
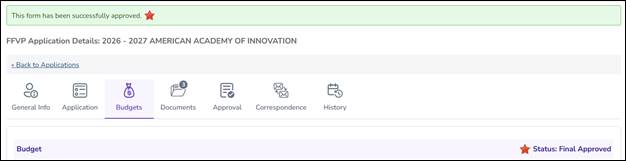
Note: Approve will trigger a green success message and change the tab status to Final Approved.
Documents Tab
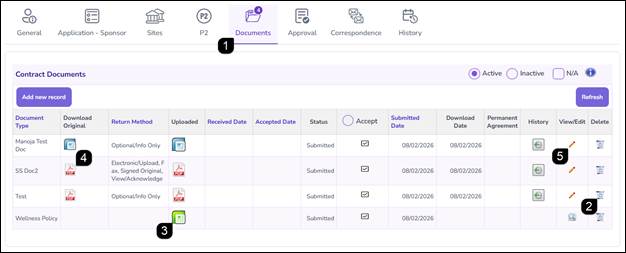
- Navigate to the Documents tab to review all required and optional documents uploaded by the SFA/Sponsor.
- Click the Trashcan icon to remove the document from the active table.
Note: The document will still be available on the Inactive table but cannot be reactivated.
- Click the Document icon in the Uploaded column to download and view the documents added by the SFA/Sponsor.
Note: The document icon indicates the type of document attached – PDF, word, excel, etc.
- Click the Document icon in the Download Original column to download the original document that the SFA/Sponsor received with their application. These documents are managed by the State Agency in Configuration > Contract Documents.
- Click the Pencil icon to open document details.
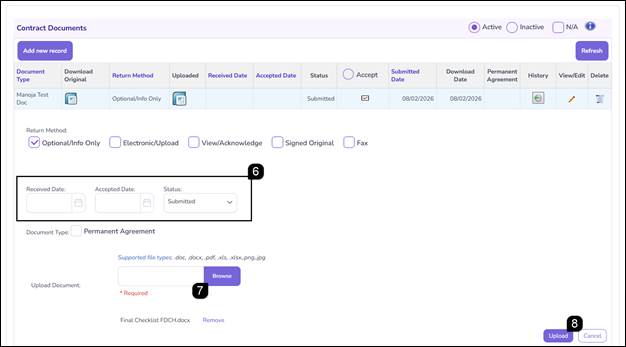
Within the document details of State Agency added Contract Documents:
- Indicate the Received Date, Accepted Date and/or Status.
- Upload a document, if received outside of the application system.
- Click Upload.
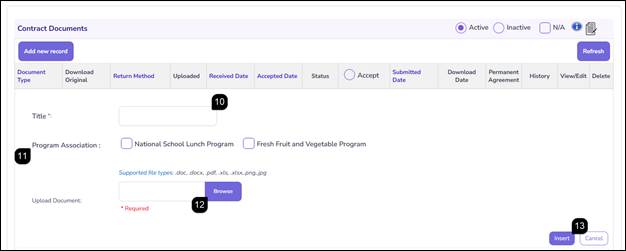
- To add a document on behalf of the Sponsor, click Add New Record.
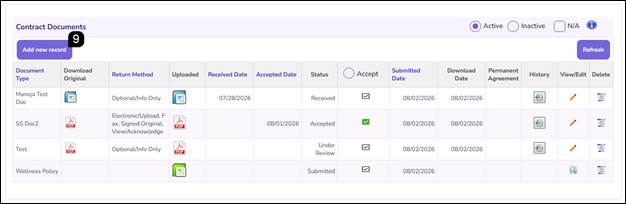
Note: Documents added by the State are automatically marked as Accepted.
- Add a document Title.
- Optionally, select a Program Association.
- Click Browse to search and add document.
- Click Insert.
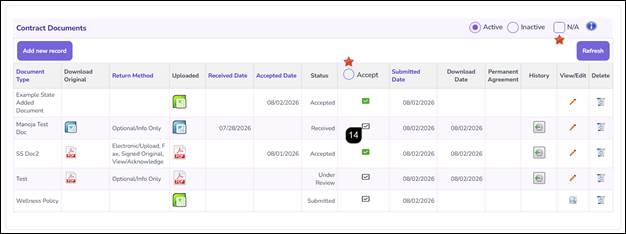
- Click the Checkmark in the Accept column for each document to verify its accuracy.
Note: Use the radio button in the Accept column header to bulk accept all documents.
Note: To approve an application without accepting every document, select the N/A checkbox in the header.
Correspondence Tab
- Navigate to the Correspondence tab to view notes and messages.
Notes:
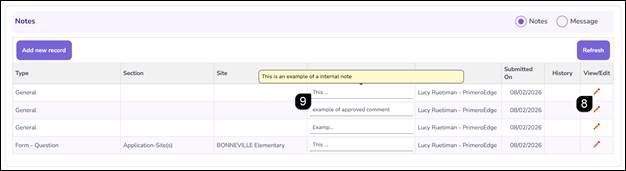
- Use the Notes sub-tab to view all notes added via pushpins throughout the application.
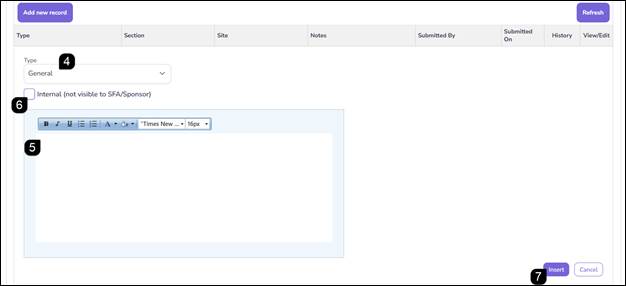
- Click Add new record to add a note directly to the Notes table.
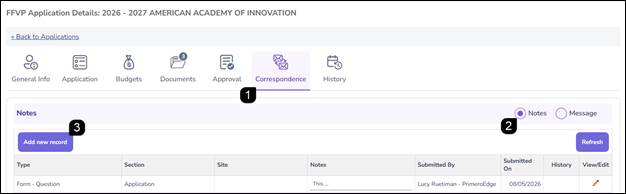
- Select the note Type from the dropdown noting that the selection could trigger additional dropdown selections.
- Enter the note in the text box.
- Check the Internal (not visible to SFA/Sponsor) checkbox to prevent the note from being shared with the SFA/Sponsor.
- Click Insert to add the note.
- Click the Pencil icon to edit existing notes.
- Hover your mouse over the note to view the whole note text.
Message:
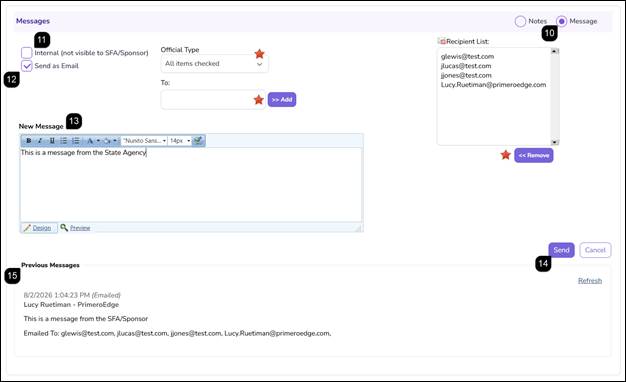
- Use the Message sub-tab to communicate with the SFA/Sponsor.
- Check the Internal (not visible to SFA/Sponsor) checkbox to keep the message on the State Agency side only and not share with the SFA/Sponsor.
- Check the Email box to send the message to the SFA/Sponsor Officials, in addition to the system notification.
Note: Add additional email recipients manually by typing the address in the To box and clicking Add.
Note: Remove email recipients by unchecking the user in the Official Type dropdown or highlight the email in the Recipient List and click Remove.
- Enter the message in the New Message textbox.
- Click Send.
- View Previous Messages below and listed in the order in which they were received (from most recent).
History Tab
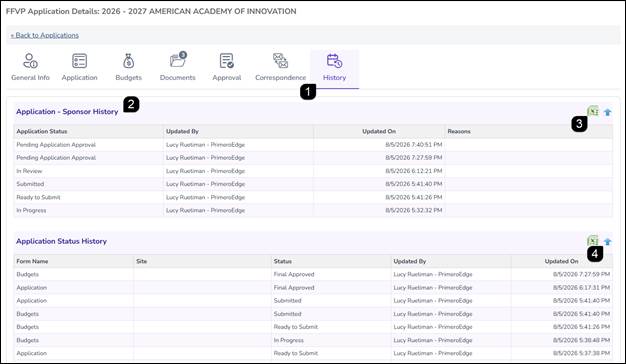
- Navigate to the History tab to view the application history.
- Each table details the history of the application as a whole or the noted application tab.
- Tables with an excel icon can be exported to excel.
- Click the blue arrow to expand/collapse the table.
Approval Tab
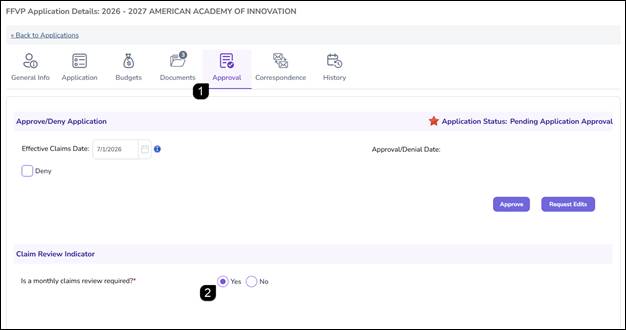
- Navigate to the Approval tab
Note: All other tabs need to be in Final Approved status, and the Approval tab status needs to be Pending Application Approval.
- Select the corresponding radio button if monthly claims review is required and click Save.
Request Edits: Approval Tab
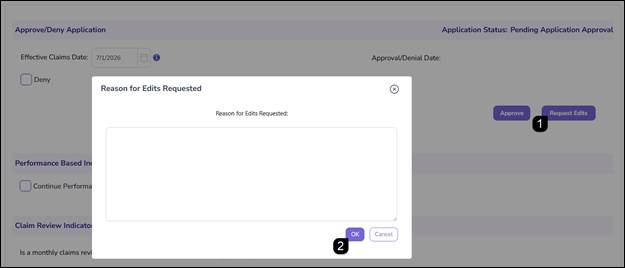
- To request edits be made to the application, click Request Edits.
- Enter the Reason for Edits Requested in the popup and click Ok.
Note: The application status will change to Edits Requested.
Note: A notification will be sent to the SFA/Sponsor letting them know that edits have been requested with details.
Deny: Approval Tab
- Select Deny checkbox.
- Choose a Denial Reason from the dropdown.
- Enter a Comment.
- Click Denied.
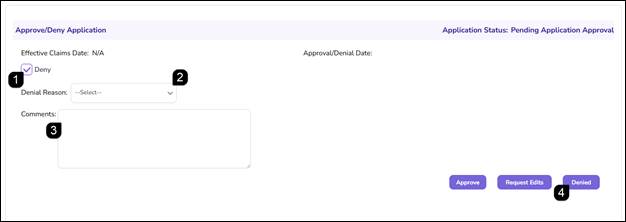
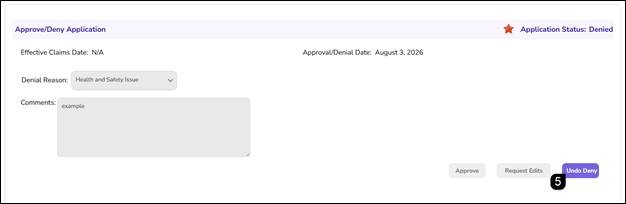
Note: The application status will change to Denied.
Note: A notification will be sent to the SFA/Sponsor letting them know that the application has been denied.
- Click Undo Deny to revert the status back to Pending Application Approval.
Approve: Approval Tab
- Adjust the Effective Claims Date, if needed.
- Click Approve.
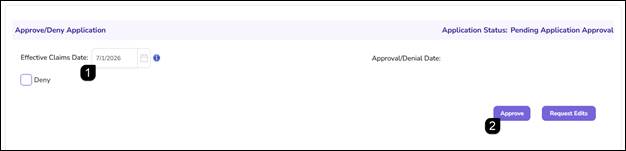
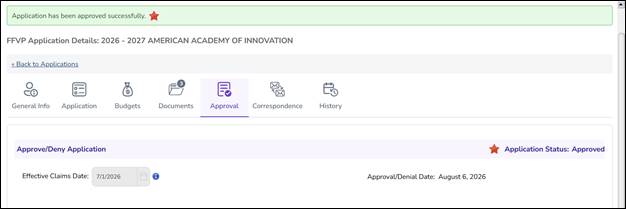
Note: Approve will trigger a green success message and change the application status to Approved.
Note: A notification will be sent to the SFA/Sponsor letting them know that the application has been approved.
FAQs
Q: Why can't I click the "Approved" button on the final Approval tab?
A: Every other tab in the application (Application, Budgets, etc.) must be in Final Approved status before the overall application can be approved.
Q: How do I communicate specific corrections to the SFA?
A: Use the Pushpin icons on specific questions to leave notes or use the Notes or Messages section in the Correspondence tab to send a detailed list of required edits.
Q: What happens to the application when I select "Edits Requested"?
A: The application status changes to Edits Requested, and the SFA is granted permission to modify their responses. You will be able to continue review of the application in the meantime.
Q: How do I hide internal review notes from the Sponsor?
A: When adding a note via the Pushpin icon or the Correspondence tab, ensure the Internal checkbox is selected before clicking Insert or Update.
Q: Can I approve an application if some required documents are missing?
A: Yes. By selecting the N/A checkbox on the Documents tab, you can proceed with the approval process without requiring every document in the grid to be in Accepted status.
Q: What happens if I click "Request Edits" on a single tab?
A: The entire application is returned to the Sponsor. You will not be able to approve or request edits on any other tabs until the Sponsor addresses the request and resubmits the application.
Q: Can I reverse an accidental application denial?
A: Yes. If a denial was made in error, navigate to the Approve/Deny Application section on the Approval tab and click the Undo Deny button to revert the status.