
Invitations (FFVP)
Purpose
This guide provides State Agency users with the steps to send FFVP invitations to eligible elementary schools, manage site-level enrollment data, and initiate new or renewal applications for SFAs that have accepted their invitations.
Step-by-Step Instructions
Configuring the Invitation Wizard and Allocation
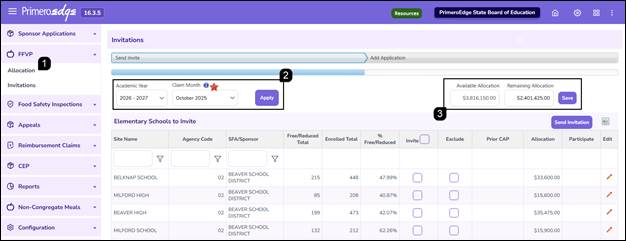
- Navigate to Program Management module > FFVP > Invitations page.
Note: Invitations can only be sent during the open and close dates defined in Configuration > Sponsor Edit Controls.
- Select the applicable Academic Year and Claim Month from the dropdown menus and click Apply.
Note: The Free/Reduced and Total Enrollment are based on prior NSLP claims. The Claim Month dropdown lists all months from the previous academic year.
- In the Send Invite section, review the Available Allocation. Make any necessary adjustments and click Save.
Managing Eligible Sites and Sending Invitations
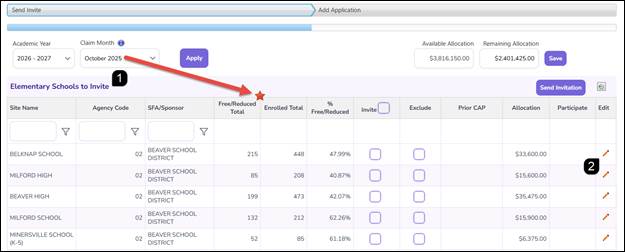
- Review the Elementary Schools to Invite table, which populates with eligible sites based on the selected Claim Month.
Note: The F/R Total and Enrolled Total are pulled directly from the claim data of the month selected in the wizard.
- To adjust student totals for a specific site, click the Pencil icon
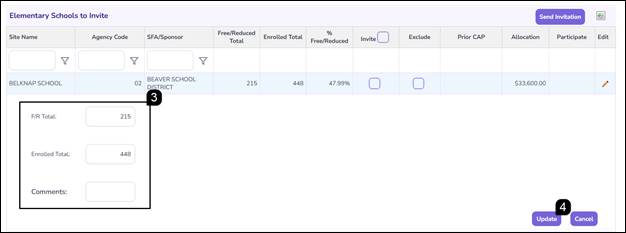
- Update the Totals and add a Comment.
- Click Update.
- Check the box in the Invite column to include the site.
Note: Check the box in the Invite column header to select all sites on the page.
- Check the box in the Exclude column to remove the site from consideration.
Note: There could be multiple pages of results in the table. Use the arrow icons, the page numbers and/or the Page Size dropdown to ensure everything has been viewed.
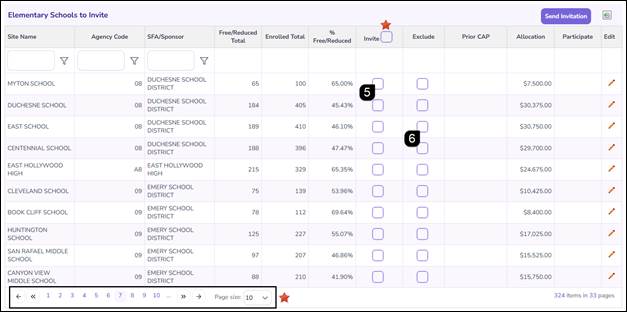
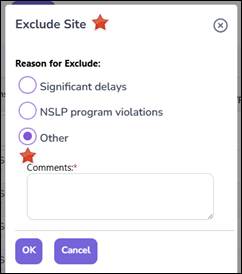
Note: Selecting Exclude requires you to select a reason from the dropdown. Choosing other will trigger a text box for manual entry.
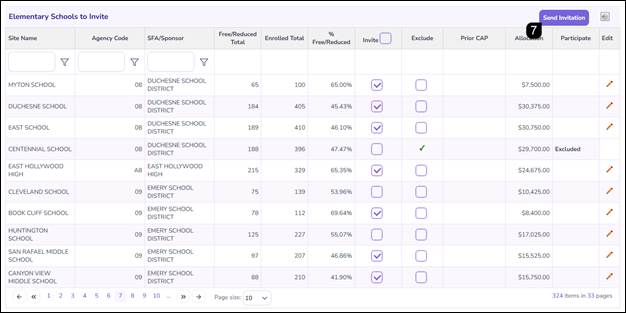
- Click Send Invitation to transmit the offers to the selected schools.
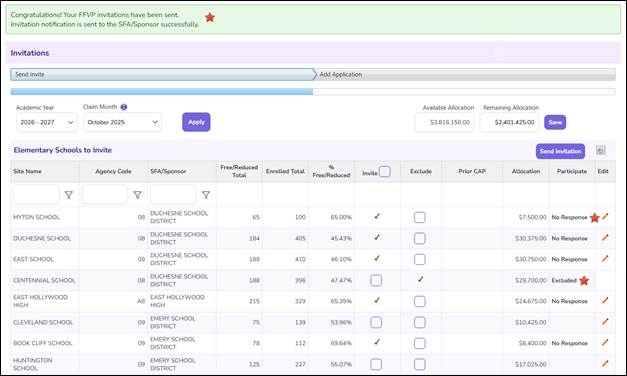
Note: A green success message will appear, and the Participate column will display "No Response" until the SFA accepts or declines. Excluded SFAs will display “Excluded” in the Participate column.
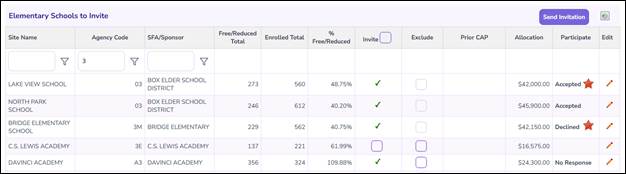
Note: The Participate column will update with the SFAs response to the invitation: Accepted or Declined.
Adding Applications
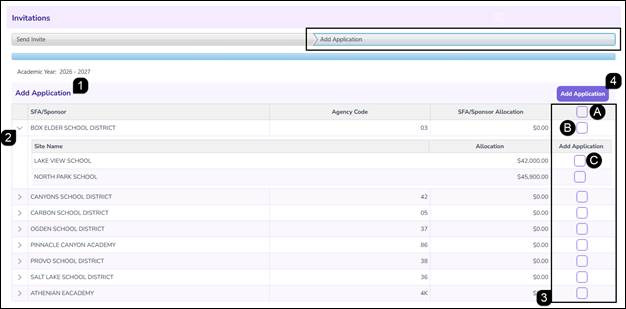
- Once invitations are accepted, navigate to the Add Application step and use the Add Application table to add applications for first-year participants.
Note: The Academic Year listed is set on the Send Invite step. If this is the incorrect Academic Year, return to the Send Invite step to adjust.
- Use the Right-Facing Arrow to expand a Sponsor’s row to view individual site details, allocations, and applications.
- Use the checkboxes to select the records to be processed:
- Select the checkbox in the header to select all Sponsors and sites.
- Select the checkbox in a Sponsor row to select all sites for that specific entity.
- Select individual site checkboxes for granular control.
- Click Add Application.
Note: There could be multiple pages of results in the table. Use the arrow icons, the page numbers and/or the Page Size dropdown to ensure everything has been viewed.
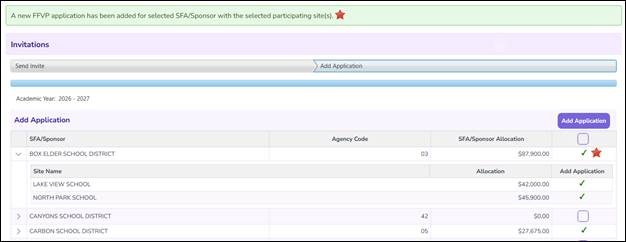
Note: Upon successful processing, a green success message will appear, the checkboxes will change to Green Checkmarks, and the application will be added to the system for completion.
Renewing Applications
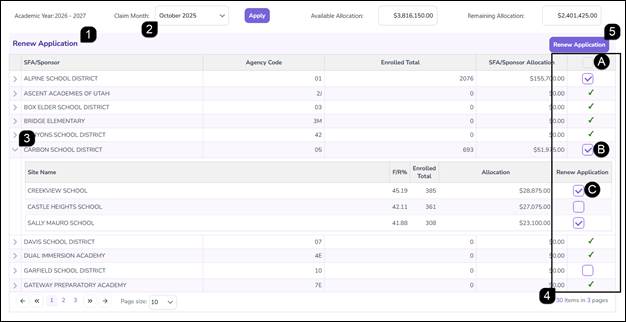
- Once invitations are accepted, navigate to the Add Application step use the Renew Application table to add applications for participants who have participated in the previous year.
Note: The Academic Year listed is year following the year set on the Send Invite step. If this is the incorrect Academic Year, return to the Send Invite step to adjust.
- Select the Claim Month from the dropdown menu and click Apply.
- Use the Right-Facing Arrow to expand a Sponsor’s row to view individual site details, allocations, and applications.
- Use the checkboxes to select the records to be processed:
- Select the checkbox in the header to select all Sponsors and sites.
- Select the checkbox in a Sponsor row to select all sites for that specific entity.
- Select individual site checkboxes for granular control.
- Click Renew Application.
Note: There could be multiple pages of results in the table. Use the arrow icons, the page numbers and/or the Page Size dropdown to ensure everything has been viewed.
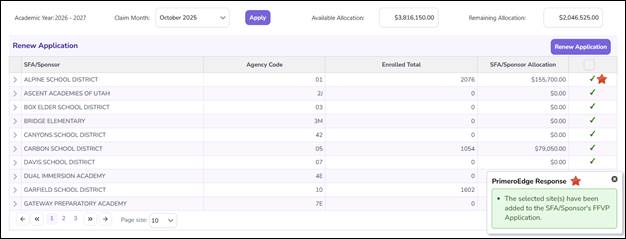
Note: Upon successful processing, a green success message will appear, the checkboxes will change to Green Checkmarks, and the application will be added to the system for completion.
FAQs
Q: Why is the Send Invitation button inactive?
A: Ensure you are within the valid date range configured in Sponsor Edit Controls. The system will not allow invitations to be sent if the window is currently closed.
Q: Where does the system pull the Free and Reduced student counts from?
A: These totals are automatically pulled from the specific Claim Month selected in the Invitation Step Wizard at the beginning of the process.
Q: Is a reason required if I decide to Exclude an eligible site?
A: Yes. If the Exclude box is checked, you must select a reason from the dropdown to maintain an audit trail of why the site was not invited.
Q: How can I tell if an SFA has accepted their invitation?
A: You can monitor the Participate column in the invitation table. Additionally, only SFAs that have accepted will appear as eligible records in the Add Application table.
Q: What does the green checkmark indicate in the Add Application table?
A: The green checkmark confirms that the application has been successfully generated and transmitted to the SFA’s dashboard for them to begin their portion of the process.