
Items
Purpose
This guide walks through the process for adding, editing, and managing items within the procurement system. This ensures accurate cataloging of items, precise usage estimation for bids, and comprehensive tracking of nutritional and allergen information.
Step-by-Step Instructions
Locating and Filtering Items
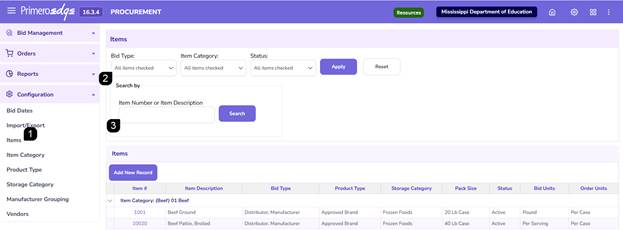
- Navigate to the Procurement > Configuration > Items page.
- Use the filter options at the top of the page to filter for specific items already in the system by Bid Type, Item Category, and/or Status. Click Apply.
- Use the Search by option to search by Item Number or Item Description. Click Search.
Adding a New Product Type
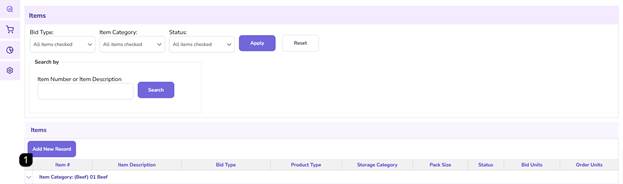
- Click Add New Record.
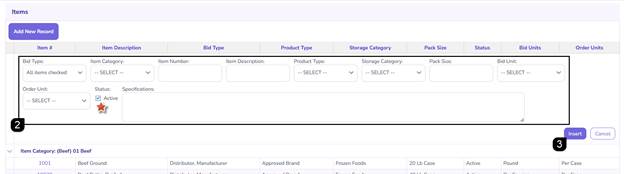
- Complete the information including:
- Select the Bid Type and Item Category. Enter the Item Number and Description. Select the Product Type and Storage Category. Input the Pack Size, Bid Unit, and Order Unit. Enter detailed Specifications.
Note: The status is automatically set to "Active" by default.
- Click Insert.
- The item will populate in the table and the Item # hyperlink to open the Item Information page.

Editing or Deactivating a Product Type
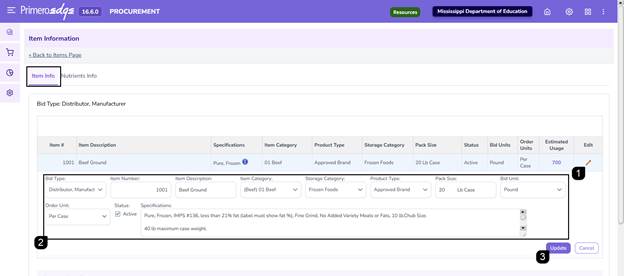
- On the Item Information page, click the pencil icon on the Items Info Tab.
- Depending on need, adjust the item information and/or uncheck the Active checkbox to deactivate.
- Click Update.
Managing Estimated Usage
- On the Item Information page, click the Estimated Usage hyperlink.
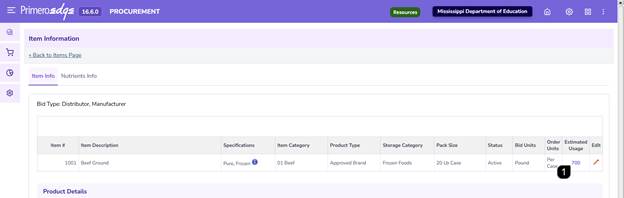
- Choose an entry method in the popup:
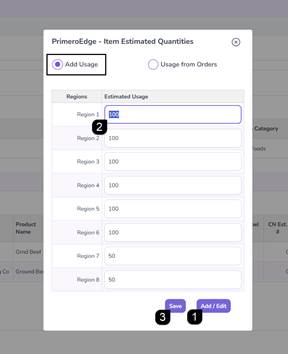
- Add Usage:
- Click the Add/Edit button
- Enter quantities by Region
- Click Save
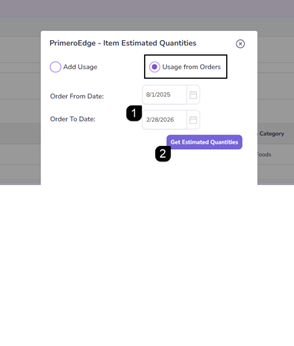
- Usage from Orders:
- Enter a specific date range
- Click Get Estimate Quantities
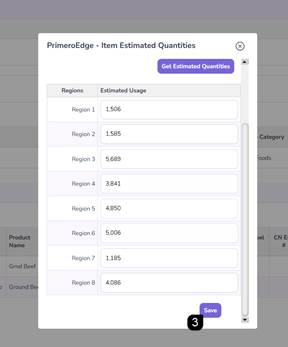
- Review the system-calculated amounts, and click Save
Configuring Product Details and Documentation
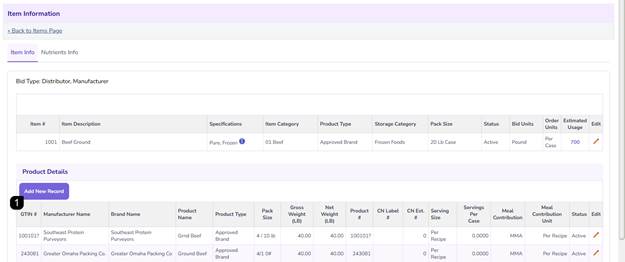
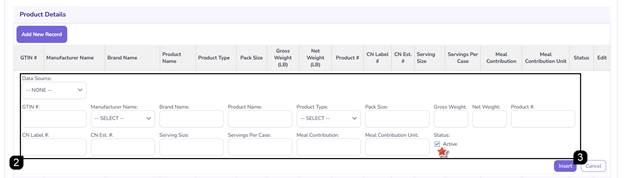
- In the Product Details section, click Add New Record.
- Input product-specific data.
Note: The status is automatically set to "Active" by default.
- Click Insert.
Editing or Deactivating a Product Details
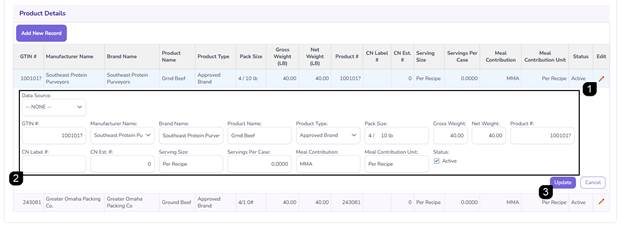
- Click the pencil icon for the product to be changed or deactivated.
- Depending on need, adjust the product information and/or uncheck the Active checkbox to deactivate.
- Click Update.
Recording Nutrients and Taste Test information
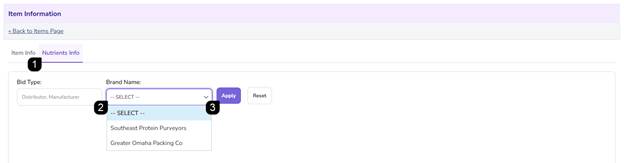
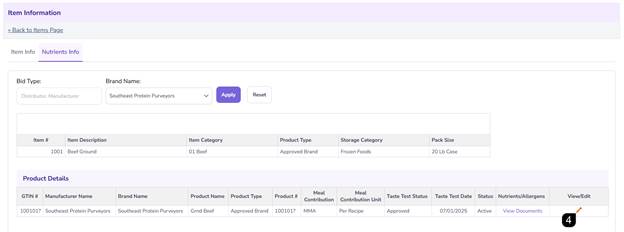
- Select the Nutrients Tab.
- Use filters for Bid Type and Brand Name.
- Click Apply.
- Click pencil icon to enter Taste Test, Nutrients, and Allergen info.
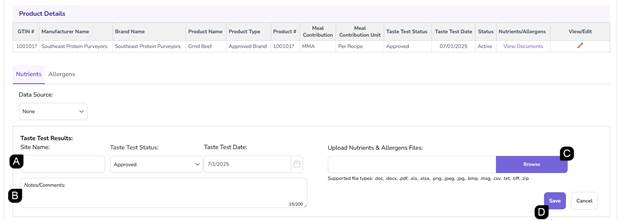
- Taste Tests:
- Add the Site Name, select the Status (Pass/Fail), and Date.
- Add Notes.
- Upload any supporting files including nutrient and allergen information.
- Click Save.
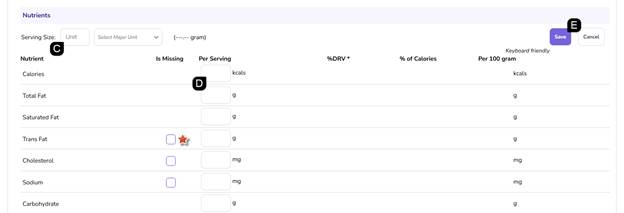
- Nutrient Entry:
- Enter the Serving Size and the Weight associated with the serving size.
Note: This is generally the serving size found on the Nutrition Facts Label. Weight must be in grams, ounces or pounds.
- Click Add.

- Enter the Serving Size amount and unit.
- Add in the nutrient info per serving.
Note: If a nutrient value is unavailable, check the Is Missing box. Do not enter "0" unless explicitly stated on the lab report/label.
- Click Save.
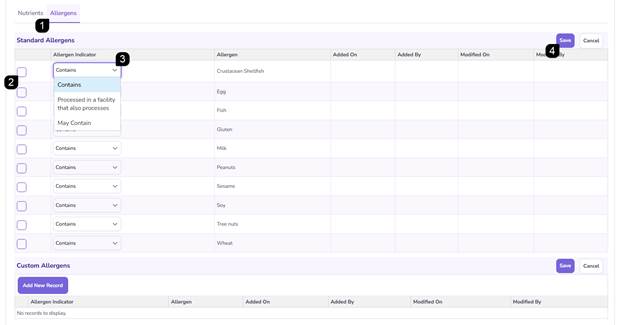
Adding Allergen Information
- Navigate to the Allergens Tab.
- Standard Allergens: Locate the Top 9 USDA allergens, check the appropriate boxes.
- Select the indicator (Contains, Processed in a facility that also processes, or May Contain) from the dropdown.
- Click Save.
- Custom Allergens: To add a non-standard allergen, click Add New Record.
- Enter the allergen name and select the indicator.
- Click Insert.
- Click Save.

Additional Notes
- Data Accuracy: Ensure the "Is Missing" flag is used correctly in the Nutrients tab to distinguish between a nutrient not being present and a lack of data.
- Future Updates: Be aware that the "Data Source" field in Product Details is subject to future system updates.
FAQs
- Q: Can the Bid Unit and Order Unit be different?
- A: Yes, the system allows these to be the same or different depending on how the vendor sells the item versus how the site orders it.
- Q: How does the system calculate usage from orders?
- A: It pulls historical procurement data from the selected date range to provide an estimated quantity for future bids.
- Q: What should I do if a product has a custom allergen not listed in the top 9?
- A: Use the "Add New Record" function in the Custom Allergens section to manually name and track that specific allergen.