
Add Recall
Purpose
This guide walks through the process of creating and distributing a USDA Foods recall notification. The Add Recall process identifies impacted Recipient Agencies (RAs), sends recall notifications to eligible contacts, and creates recall records for Recipient Agency review and response.
Step-by-Step Instructions
Entering Recall Information
- Navigate to the Food Distribution module > Recalls/Complaints > Add Recall page.
- Select the applicable School Year and Program
- Select the Recall Class, Date of Recall, the Item, set the Delivery Date Range, and Recall Selection Criteria.
Note: Recall Classes include Class I, Class II, and Class III based on the severity of the recall. Hovering over the blue I icon will provide details on the Recall Classes.
Note: Recall Selection Criteria includes Lot Number, Sales Order Number or Sales Order Number & Lot Number. Lot Numbers will not be available unless they are added as part of the Receipt process.
- Click Apply to add information matching the recall criteria.
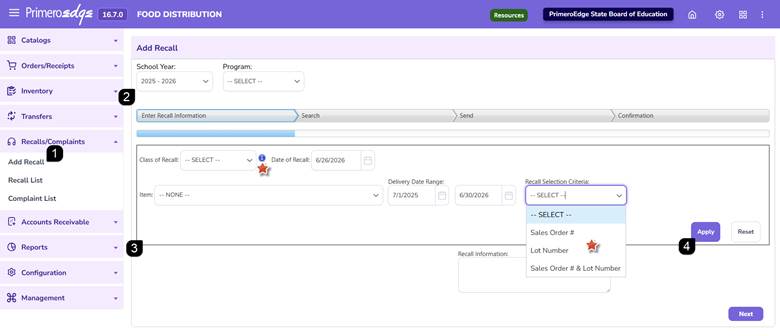
Adding Recall Selection Criteria
- Enter the applicable selection criteria depending on Recall Selection Criteria chosen.
- Sales Order #: Select from dropdown and click Apply.
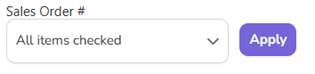
- Lot Number: Enter Individually and click Add after each and repeat.

- Sales Order # & Lot Number: Select Sales Order Number from the dropdown and then select Lot Number. Click Apply.

Note: If Sales Order Number is selected as the Recall Selection Criteria, users may select from available Sales Orders in the system.
Note: Lot Numbers will not be available as a selection with Sales Order Number unless they are added as part of the Receipt process.
- Use the trashcan icon to delete added Sales Order Numbers and/or Lot Numbers.
- Enter any recall comments or instructions.
- Click Next to continue.
Note: Click Reset to undo selections and start over.
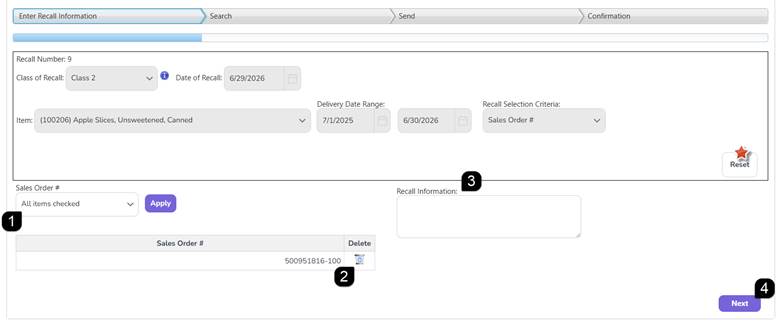
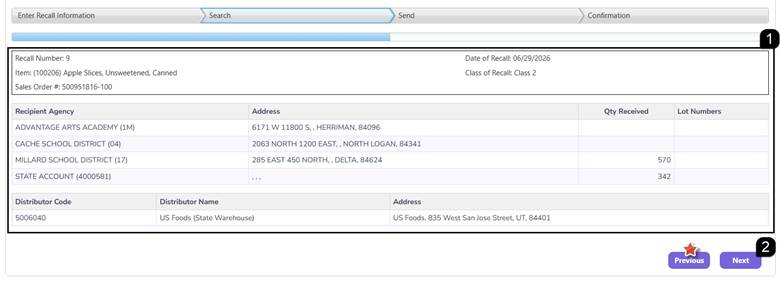
Reviewing Impacted Recipient Agencies
- Review the system-generated Recall Number and the list of impacted Recipient Agencies.
- Click Next to continue.
Note: If updates are needed, click Previous to return to the Recall Information step.
Sending Recall Notifications
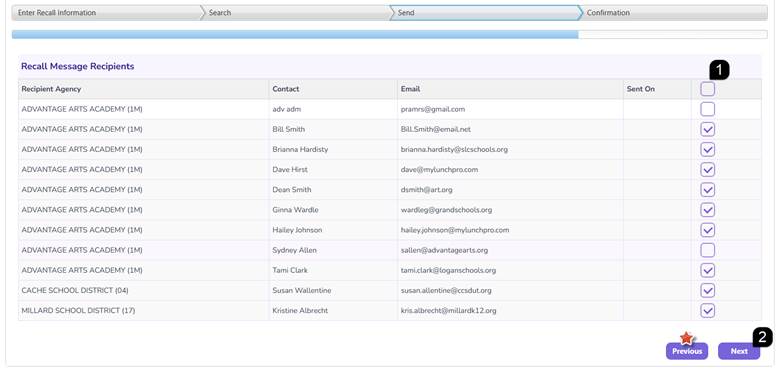
- Review the list of eligible Recall Message Recipients. Select all recipients using the header checkbox or select individual Recipient Agency contacts.
- Click Next to send the recall notifications.
Note: If updates are needed, click Previous to return to the Search Information step.
Note: Only Recipient Agency users assigned a role with Recall List permissions and an active email address will appear in the Recall Message Recipients list.
Note: Even if a Recipient Agency does not have eligible email recipients, the recall will still appear in the Recipient Agency Recall List.
Confirming the Recall
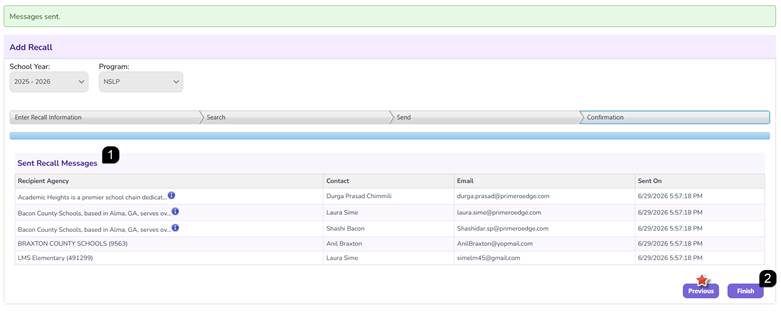
- Review the recipients and notification information displayed on the Confirmation page. Verify the date and time the recall notifications were sent.
- Click Finish to complete the recall process.
Note: If updates are needed, click Previous to return to the Send step.
FAQs
Q: Can I recall multiple lot numbers?
A: Yes, additional lot numbers can be added during the Recall Selection Criteria step.
Q: Can I notify only specific Recipient Agencies?
A: Yes. During the Send step, you may select individual recipients or all eligible recipients.
Q: Why doesn't a Recipient Agency contact appear in the notification list?
A: The user must have a role with Recall List permissions and an active email address configured in their user profile. Additionally, only users from Recipient Agencies associated with the applicable Sales Order(s) and/or Lot Number(s) will be listed.